|
|


Route Builder |

|

|
|
Route Builder |
|
|
|
|
Route Builder |
|
|
|
Route Builder |
|
|
|
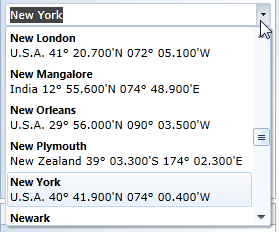
Enter the first few letters of the required port name in the Enter Port Name field and when the required port is displayed, press ENTER and the port is added to the list of voyage ports. Repeat this process for each port to be included within the voyage. If you are unable to find the required port in the list, try using the search capabilities of the Ports Data Grid to locate it.
When the required list of ports is complete, click the 'Calculate' button in the toolbar and the distance will be calculated and displayed below the port list. The route will be displayed on the Map and the Voyage Details panel will display a row for each leg of the voyage indicating the individual leg distance and ETA etc.
Some ports are known by more than one name, or have more than one valid spelling in the Latin alphabet ("alias ports"). These ports may be referred to by any of their names.
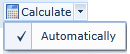
The Calculate button includes a Drop-Down option entitled 'Automatically' which if checked by clicking on it will result in the calculation being done as soon as the port list changes.
If the relevant System Option is set, pressing ENTER in the Enter Port Name field with no port selected will also cause the distance to be calculated.
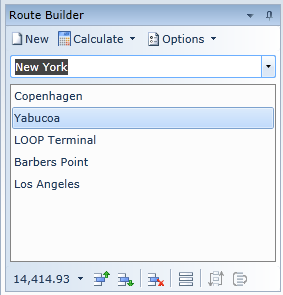
If an existing port is selected within the list, the next port entered will be inserted before the selected port. In the screenshot on the left, New York will be inserted before Yabucoa.
Ports can be moved up or down or removed from the list by using the buttons in the toolbar bar at the bottom of the panel.
|
|
If the drop-down button to the right of the Enter Port Name field is clicked, the alphabetical list of ports is displayed, with the currently selected port name highlighted. The Up/Down arrow keys or the scroll bar can be used to browse the list.
The selection of ports using the Enter Port Name field will always locate the first port whose name 'Starts With' the entered characters. If you wish to locate a port where a specific sequence of characters appears anywhere within the name, you can use the filtering capabilities within the Ports Grid. |
|
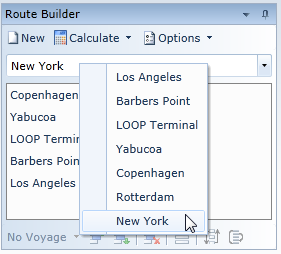
As ports are used, they are added to 'Context Menu' within the Enter Port Name field. The most recently used port is displayed at the top. This provides a quick means of entering ports which have recently been used.
The number of ports listed can be controlled within the System Options, up to a maximum of 20. |
|
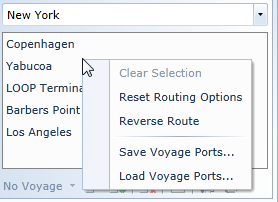
A 'Context Menu' on the list of ports itself provides the ability to:-
❖Clear the currently selected port ❖Reset the routing applicable to a voyage leg back to their defaults ❖Reverse the route ❖Save the current voyage port list and ❖Load a previously saved voyage port list |
Voyage Toolbar Buttons |
|
|
Clear the current voyage and start over. |
|
The Calculate button will cause the software to calculate the distance for the specified list of voyage ports with their relevant routing options. It will also plot the route used on the Map, update the display of Voyage Legs and Waypoints, and (depending on the options selected in the Ribbon Bar) scan the route.
If the 'Automatically' option is checked on the buttons Drop Down menu, the calculation will be performed whenever the list of ports or any routing options are changed. If this option is not selected the Voyage Duration, (S)ECA Mileages, Voyage Leg Summary and Waypoints List will indicate when recalculation of the voyage is required. |
|
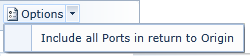
If the 'Include all Ports in return to Origin' option is selected, then the voyage port list is updated to reverse the route to return to the first port via all the previous ports visited,
For the following voyage port list:
Copenhagen, Rotterdam, Le Havre, Lavera
With the option unchecked, clicking the 'Return to Origin' button would update the port list to:
Copenhagen, Rotterdam, Le Havre, Lavera, Copenhagen
With the option checked, clicking the 'Return to Origin' button would update the port list to:
Copenhagen, Rotterdam, Le Havre, Lavera, Le Havre, Rotterdam, Copenhagen |
Distance & Port List Toolbar Buttons |
|
|
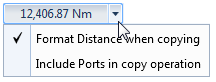
The calculated distance for a voyage is displayed on the leftmost button on the toolbar below the voyage port list. Clicking the button, will copy the total voyage distance (rounded to the nearest mile) to the Windows Clipboard. The button has a drop down menu with options to format the copied distance and/or to include the Ports in the copy operation.
Access to the Windows Clipboard from a Silverlight application is restricted, and the first time this functionality is used you will be asked to confirm that you wish to allow the application to access the Clipboard. More information is available in the Silverlight Interaction topic. |
|
Move the selected port in the voyage port list up by one position. |
|
Move the selected port in the voyage port list down by one position. |
|
Delete the selected port from the voyage port list. |
|
Clear the selection of the currently selected port. |
|
Reverse the order of the ports listed for the current voyage. |
|
Return to the first port in the voyage, intermediate ports are included if the 'Include all Ports in return to Origin' option is checked (see above).
This option will be disabled if the first and last ports of the voyage are the same, if the voyage already contains the maximum number of ports or if adding the necessary ports to return to the origin would cause the maximum number of ports in the voyage to be exceeded. |