|
|


Inserting Waypoints |

|

|
|
Inserting Waypoints |
|
|
|
|
Inserting Waypoints |
|
|
|
Inserting Waypoints |
|
|
When editing a route to reflect a specific requirement for a distance, it will usually involve inserting one or more waypoints into that route.
There are three ways in which this can be done.
Insert Waypoints by simply clicking on map
As referred to in the introductory help topic, perhaps the simplest method of inserting a waypoint into a route is to simply click close to the route, i.e. the line between two existing waypoints. The waypoint will be inserted at the geographical position of the mouse pointer and by default will be inserted in the nearest existing link between two other waypoints. It can then be dragged to a new location or have its properties adjusted as required.
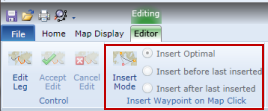
Insert Mode
|
On the Editing ribbon bar tab there is a section entitled "Insert Waypoint on Map Click", "Insert Mode" is a toggle button which when clicked first clicked takes you into an insert mode and then when clicked again leaves that mode.
When in Insert Mode, a shaded border is displayed around the button and each click on the map with the Left mouse button will result in a waypoint being inserted into the route at the geographical location of the mouse click. This provides a very fast method of inserting a series of waypoints into a route. |
The three radio buttons control where the clicked location is inserted into the route.
Insert Optimal |
This will insert a waypoint at the clicked location into the route between the two closed waypoints to that location. In many cases this will deliver the desired result. |
Insert before last inserted |
This will insert a waypoint at the clicked location into the route before the previously inserted waypoint. By 'Before' we mean closer to the start of the route. |
Insert after last inserted |
This will insert a waypoint at the clicked location into the route after the previously inserted waypoint. By 'After' we mean closer to the end of the route. |
NB - When all the required waypoints have been inserted using this method, make sure the Insert Mode button is clicked again to take you out of this mode as otherwise the next click on the map will insert a waypoint at a location where it is not wanted.
Using the Insert Waypoints Dialog
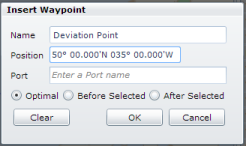
When editing a route, click on the map with the Right mouse button and select Insert Waypoint from the displayed context menu and the following dialog will be shown.
|
The displayed dialog allows a Waypoint Name to be specified. This will help identify the location within the waypoint list and will be displayed in the Leg Waypoints window on completion of editing and it will also appear on the voyage reports.
The latitude and longitude is entered to set the waypoints location.
The three radio buttons, Optimal, Before Selected and After Selected help to control where in the route the specified waypoint is inserted.
For the majority of cases, the Optimal option will place the inserted waypoint into the route where expected. This is determined by inserting the waypoint between a pair of waypoints which results in the increase in distance being minimized.
With Before Selected or After Selected specified, the waypoint will be inserted on the specified side of the selected waypoint. Before is towards the start of the route; After is towards the end of the route. |
|
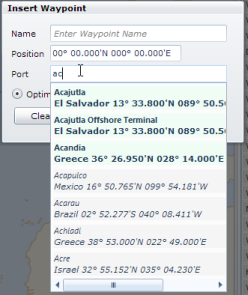
As an alternative to entering the name and position, these details can be selected based on a port.
For example, Acapulco could be inserted into a route from the Panama Canal to Los Angeles.
The "Distance Tables" include over 3,000 ports that are most frequently visited by vessels engaged in the international shipping trade and between which distances can be calculated. In addition, the names and positions of over 5,000 other ports are also included as a source of information.
When inserting a waypoint into a route, any of those port positions can be used. The drop down list with the Port name selection box displays the Name, Country and geographical location of each of those ports. Those included within the Distance Tables are identified by having a pale green background and a bold font.
Selecting one of the ports not included in the Distance Tables, those in an italic font on a grey background, simply inserts that location into the route as a single waypoint. It does not result in a route to or from that port being inserted and it is left to the user to edit the port approach and departure as required in order to approximate the distance. |